Showing posts with label Fujimi. Show all posts

GUEST GALLERY: F7U-3 Cutlass 1/72 by RICARDO RODRIGUEZ.

"The final result cannot be called realistic, but I would not define it as fantasy either, but perhaps conceptual. I have mixed parts of different Cutlass into one, in several states that would not coexist in practice. The paintwork reproduces a complete restoration of the aircraft from one end to another. This allowed me to explore all the possibilities of the metallic finish over one single subject, and to appreciate all the variations. In fact the contrast is so high between both fuselage sides that I might actually describe it as two models in one. All these strong contrasts and the huge variety of effects and parts finally meant that the end result satisfied me much more that my original idea." -Ricardo Rodriguez.

Another masterpiece I love, again from Ricardo Rodriguez. This Cutlass, aside from the great paintjob and detailing skills, is a model full of interesting and original details. In first place I love two faced models, showing different things on both sides. Here you can see a degraded plane with opened panels on one side and a newly painted plane on the other. I also love all those interesting details as the detailed opened panels, the primer painted zones, the degraded paint, the weathering effects and the markings masking (a master touch). In short, a model that can be watched for hours.

Q


  • Digg
  • Del.icio.us
  • StumbleUpon
  • Reddit
  • RSS

The "Persian Connection" work: Fujimi 1/48.

After the Anglo-Iraqi war in 1941 the Germans gave their military support to the Iraqis against the British. The Luftwaffe created the "Sonderkommando Junck" to oppose the RAF forces. The aircrafts carried Iraqi insignia but were flown and maintained by German crews. This subject is a Messerschmitt Bf 110 D3 assigned to the Sonderkommando Junck in 1941; the Iraqi insignias were painted over a layer of RLM 02 primer that was previously used to hide the German markings. The German camouflage remains the same including the shark mouth and yellow cowlings of the 4./ZG 76. This was a funny exercise of guerrilla modelling, almost OOB, besides the antenna wire I only added the panel lines and rivets in the wing zone between the engines and the main fuselage. The camo was painted with Tamiya and Gunze acrylics diluted with lacquer thinner. After the decals were applied I added a gentle weathering with blended oil paint and some post-shading effects with Tamiya Smoke. Finally I added small chips and scratches with crayon pencils.
A quick build of an interesting subject.

Diego Quijano.


  • Digg
  • Del.icio.us
  • StumbleUpon
  • Reddit
  • RSS

Detailing a Fujimi F-18 1/72 (Part IV, Final)


The rear section: Airbrake and engine bays:
La sección trasera: Aerofreno y bodega de motores:

47: The first thing I did was to relocate the engine´s cooling grilles a little rearward.  After hollowing the plastic I made the grids with styrene stripes, then Fujimi´s grilles were eliminated with putty. The airbrake housing was detailed in the usual way; the thicker pipes were too curved so I used copper wire instead of stretched sprue.
47: Lo primero que hice fue  rehacer las rejillas de refrigeración de los motores en una posición un poco más retrasada. Después de ahuecar el plástico hice las rejillas con varillas finas de estireno, entonces eliminé las rejillas de Fujimi con masilla y lija. El emplazamiento del aerofreno está detallado del modo usual; los tubos más gruesos eran demasiado curvos para hacerlos con plástico estirado así que utilicé alambre de cobre.


48: The two halves of the kit are not separated exactly on the access doors hinge line so I had to cut a section of the lower half of the kit and attach it to the upper one, then I eliminate the join with Tamiya putty. The next step was to make the firewall that separates the two engine housings with thick styrene sheet.
48: Las dos mitades del kit no están separadas exactamente a lo largo de la bisagra de las puertas de acceso así que fue necesario cortar una sección de la mitad inferior del kit y pegarla a la mitad superior, entonces eliminé la junta con masilla de Tamiya. El siguiente paso fue construir el muro que separa los dos habitáculos de los motores con lámina gruesa de estireno.


49-50: The interior detail was built using the arsenal of styrene and stretched sprue. The pieces with panel lines and round rivets were marked before gluing them in place. The port side bay is less detailed because is where the engine will be located. The access doors are from the kit; before detailing the structure I first thinned the inner side with a curved blade, files and sandpaper.
49-50: Para detallar el interior utilicé todo el arsenal de estireno y plástico estirado. Las piezas grabadas con líneas de panel y remaches se marcaron antes de colocarlas en su lugar. El habitáculo de babor está menos detallado porque será el que albergue el motor. Las puertas de acceso son las del kit, antes de detallar la estructura adelgacé el lado interior de las piezas con una cuchilla curva, limas y lijas.


51: The General Electric F404 turbofan engine. First, the main shape was made with plastic pipes, and then I detailed the slightly raised elements and made a resin copy. Over the resin piece I built the complex elements mainly using styrene pieces although you can also see some elements from metallic wire. The exhaust nozzle is also made with pieces of styrene sheet.
51: El motor General Electric F404 turbofan. Lo primero fue hacer la forma principal con tubos de estireno y luego añadí los detalles con poco relieve, a continuación  hice una pieza de resina. Sobre dicha pieza de resina añadí los elementos complejos usando principalmente piezas de estireno y plástico estirado aunque también podéis ver algunos elementos de cable metálico. La tobera también está hecha con piezas de láminas de estireno.

Putting the things together / Juntando las piezas:

52-53: Ok, the main detailing phase is completed so is the  time to assemble the model. Nothing exceptional to mention: styrene cement, some putty here and there, sandpaper...the usual. As you can see I removed the rudders to relocate them slightly moved. I also added the structural strengthening pieces from styrene sheet.
52-53: La fase de detalle principal por fin está completada así que llegó el momento de montar la maqueta. No hay nada excepcional que mencionar: pagamento para estireno, algo de masilla aquí y allá, lija...lo usual. Como podéis ver separé los timones de las piezas de la cola para recolocarlos  un poco girados. También añadí los refuerzos estructurales hechos con piezas de estireno.


54: The F-18 has slotted-flaps. This type of flap has a gap between the wing and the leading edge of the flap. In order to locate the flaps in the proper extended position, I used sections of copper wire to ensure a strong flaps-to-wing assembly.
54: El F-18 tiene flaps de tipo "slotted" o ranurado. Este tipo de flap deja una separación entre el ala y el borde de ataque del flap en posición extendida. Para colocar los flaps en la posición correcta usé secciones de alambre de cobre para asegurar una unión firme entre los flaps y las alas.


55-56: In these pictures you can see the correct position of the extended flaps and the slot between flaps and wing.
55-56: En estas fotos podéis ver la posición correcta de los flaps extendidos y la ranura entre flaps y alas.


57: The air intake interiors must be painted white before they are assembled. It is also advisable to paint the camo-coloured zone in front of the air intakes before attaching the deflector panels.
57: El interior de las tomas de aire deben ser pintadas de blanco antes de ser pegadas en su lugar. También es aconsejable pintar la zona camuflada delante de las tomas de aire antes de pegar las piezas de los paneles deflectores.


58: This is the end of the detailing and assembly process. I have avoided the pictures of the cockpit painting in order to focus the article only in the detailing and assembly. The only zones painted at this moment are the cockpit, the cannon bay, the air intakes and the zone in front of them. In the picture you can see all the pieces that must be painted before assembling them.
58: Este es el final del proceso de detallado y montaje. He evitado las fotos de la pintura de la cabina para concentrar el artículo en el detallado y montaje. Las únicas zonas pintadas de momento son la cabina, la bodega del cañón, el interior de las tomas de aire y la zona delante de ellas. En la foto podéis ver todas las piezas que deben ser pintadas antes de colocarlas en su lugar.

I know that there may be some steps that I have not explained too well, so if anybody has any questions or observations don´t hesitate in contact me.
For me, adding some detail to a model is really gratifying. I hope this article will help other modellers to find it gratifying too.
Finally I would like to thank Ralph Riese again for his help in the translation and making this text comprehensible.

Sé que puede haber algún paso que no está explicado demasiado bien así que si tenéis alguna duda u observación no dudéis en preguntar.
Para mí, añadir algo de detalle a una maqueta es realmente gratificante. Espero que este artículo ayude a que otros modelistas también lo encuentren gratificante.

  • Digg
  • Del.icio.us
  • StumbleUpon
  • Reddit
  • RSS

Detailing a Fujimi F-18 1/72 (Part III)


The landing gear / El tren de aterrizaje:


33-34: The landing gear details are made with both styrene pieces and stretched sprue sections.  I made the structure details with styrene pieces, and then added wires and pipes with stretched sprue.
33-34: Como veis, los detalles de los trenes están hechos con piezas de estireno y secciones de plástico estirado. En primer lugar hice los detalles de la estructura con piezas de estireno y una vez terminado añadí los cables y tubos hechos con secciones de plástico estirado doblado. 


35: A comparison between pre-detailed and detailed front landing gear. The front landing gear strut was painted separately to simplify both the masking and painting of the well.
35: Comparación del tren delantero antes y después del detallado. Este tren delantero se pintará por separado para facilitar el proceso de pintura y el enmascaramiento del pozo delantero. 


36-37: The interior of the front landing wheel well. In this case the first step is to add wall relief details with styrene stripes and other pieces. Next I added the pipes along the bottom of the well using insulated wire or stretched sprue. Finally I detailed the lateral and raised elements.
36-37: El interior del pozo delantero. El primer paso es construir la estructura de las paredes del pozo con varillas de estireno. A continuación se añaden las tuberias a lo largo del fondo del pozo hechas con plástico estirado y con cable eléctrico aislado (con recubrimiento plástico). Finalmente se añaden los elementos en relieve que hay en las paredes laterales.


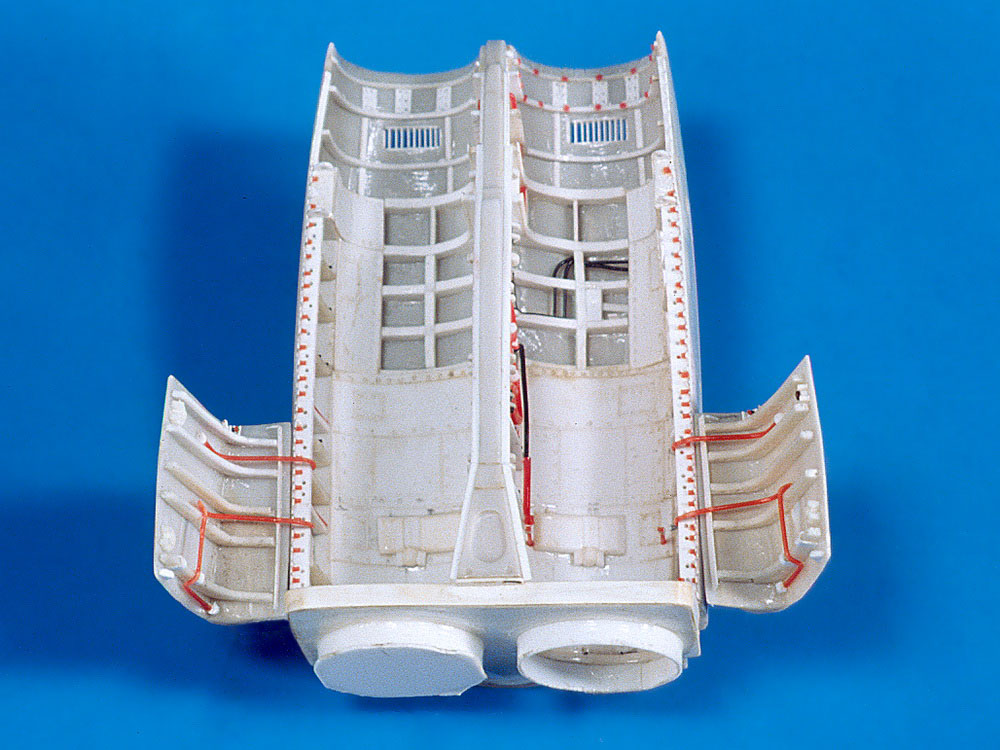
38-39: The main landing gear. Again, the first step is to build the well structure detail. Unlike the front strut, I decided to attach the landing gear struts before the painting phase. The reason was that the union between struts and wells is much more complicated here with many more elements. I detailed the struts before attaching them to the wells.
38-39: El tren de aterrizaje principal. De nuevo, el primer paso es construir la estructura del pozo. A diferencia del tren delantero, decidí pegar los trenes principales al pozo antes de pintarlos. La razon es que aquí, la unión entre las barras del tren y los pozos es mucho más complicada y con más elementos. El detallado de las barras del tren está hecho ates de pegarlas a los pozos. 

 
40-42: Several views of the detailed main landing gear. With the landing struts in position the next step is to add the wires and pipes with black stretched sprue. This is a bit burdensome and boring but not difficult.
40-42: Varias vistas del tren principal detallado. Con las barras del tren ya pegadas a los pozos se añaden los cables y tobos hechos con plástico estirado negro. Es un poco laborioso y aburrido pero no es dificil. 


43: The wheel well doors also need some detailing. Firstly I thinned the edges with a sharp blade and eliminated the round mould marks, and then I added the details with styrene pieces. On the left you can see the doors before detailing; and on the right the detailed ones.
43: Las compuertas de los pozos tambien necesitan algún detallado. Para empezar adelgacé los bordes con una cuchilla curva y eliminé las marcas redondas del molde. Entonces añadí los detalles con piezas de estireno. A la izquierda están las compuertas sin detallar y a la derecha ya terminadas.


Fixing the wings / Modificando las alas: 
44: I wanted to display the flaps and slats extended so I had to cut some pieces off the wings and bent others. In this picture you can see the pieces that must be cut from both wing halves. The cuts are made along the panel lines with a sharp blade. The two marked lines don´t need to be cut but only bent.  To do that I engraved the marked lines on the lower surface of the wing halves with a scriber to thin the plastic. Now is easy to bend these two pieces.
44: Quería presentar los flaps y slats en posición extendida así que tube que separar algunas piezas de cada ala y doblar otras. En esta foto se puede ver las piezas que deben ser cortadas de cada mitad del ala. Los cortes se hacen a lo largo de la línea de panel con una cuchilla afilada. Las dos líneas marcadas no hace falta cortarlas sino solo doblarlas, para ello se marcan las líneas con un scriber por la parte inferior de cada pieza del ala para adelgazar el plástico. Entonces es sencillo doblar las piezas hacia abajo. 


45: Comparison of the lower wing before and after fixing it. On the left you can see the lines that must be cut (green) and bent (black). On the right you can see the slats line bent and the flaps separated.
45: Comparación de la mitad inferior del ala antes y después de modificarla. A la izquierda se pueden ver las líneas que deben ser cortadas (verde) y dobladas (negro). A la derecha se puede ver la línea de slats ya doblada y los flaps separados.  


46: Comparison between the upper wing before and after. With the two halves of the slats glued and the line bent there is a gap on the upper wing for the folding surface. I made this with a rod of slightly conical stretched sprue (red). The curved surface of the flaps is made with Tamiya epoxy putty and sanded to the right curvature.
46: Comparación de la mitad superior del ala antes y después. Con las dos mitades de los slats pegados y la línea de giro doblada hacia abajo queda un hueco en la parte superior del ala para colocar la superficie de giro. Esta superficie está hecha con una varilla de plástico estirado (rojo) ligeramente cónico. La superficie curva de los flaps está hecha con masilla epoxi a lijada para darle la curvatura correcta.

  • Digg
  • Del.icio.us
  • StumbleUpon
  • Reddit
  • RSS

Detailing a Fujimi F-18 1/72 (Part II)


18-19: The work so far, the cockpit is almost ready, the only thing remaining is the canopy.
18-19: Así va la cosa hasta ahora. El cockpit está casi listo, solo falta el canopy.


20: I detailed the canopy frame mainly with Verlinden photoetched pieces to which I added some styrene elements. In the picture you can see some red cylinders, black cables and white square pieces.
20: En el detallado del canopy usé principalmente piezas del fotograbado de Verlinden sobre el que añadí algunas piezas de estireno. En la foto se pueden ver algunos elementos cilíndricos de color rojo, cables negros y piezas cuadradas blancas.


21: When detailing the canopy hinge we must ensure that the canopy frame fits properly with the fuselage piece.
21: En el momento de detallar el encastre del canopy hay que asegurarse de que el canopy encaja perfectamente en la pieza del fuselaje.


The cannon build / La construcción del cañón:

22: The M61 20mm Vulcan Cannon was an interesting challenge. The exercise was not only to detail a piece but to build an entire complex assembly from scratch. As WITH many other things it´s not complicated once you get into it. The method is quite simple. To start, I built the main shape with big pieces of styrene trying to imitate the general dimensions, and then I imitated the superficial structure with smaller pieces until I got enough similarity with the real cannon. The last step was to build the small elements as rivets, screws, etc, focusing in the areas that will be visible. Of course, It´s important to have enough pictures of the real cannon and to analyze them so we can visualize the different parts before we build them. Apart from the styrene pieces I also used masking tape to imitate a fabric cover in the ammunition feed system.
22: El cañón M61 Vulcan de 20mm fue un reto interesante, el asunto fue no solo detallar una pieza determinada sino construir de cero un elemento complejo. Como con la mayoría de las cosas, no es complicado una vez que te pones a ello. El método es bastante simple, en primer lugar construyo la forma principal con piezas grandes de estireno intentando imitar las dimensiones generales, entonces se imita la superficie de la estructura con piezas más pequeñas hasta conseguir suficiente similitud con el cañón real. El último paso es añadir los elementos más pequeños como remaches, tornillos, etc, concentrándonos en las zonas que serán visibles. Por supuesto en importante tener suficientes fotos del cañón real y analizarlas para poder visualizar las diferentes antes de construirlas. A parte de las piezas de estireno también usé cinta de enmascarar para imitar una cubierta de tela en el sistema de alimentación de munición.   


23: To imitate the ammunition feed system I used a leftover 1/35 photoetched ammo belt, sorry I don´t remember the manufacturer. I bent the extremities of the projectiles and then I curved the belt to get the right shape.
23: Para construir el sistema de alimentación de munición usé una cinta de munición en fotograbado a escala 1/35 sobrante de otra maqueta (lo siento, no recuerdo de que marca). Doblé los extremos de los proyectiles hacia adentro y entonces curvé la cinta hasta darle la forma adecuada.


24: The ventilation duct is made with coiled copper wire. The intake is also made with masking tape.
24: El conducto de ventilación está hecho con hilo de cobre enrolladlo, la entrada de aire del conducto también está hecha con cinta de enmascarar.


25-26: Notice that I only detailed what will be visible through the open panels, that is, the left side and the bottom.
25-26: Fijaos en que solo he detallado las zonas que serán visibles a través de los paneles abiertos, es decir, el lado izquierdo y la zona inferior.


The avionic bays / Las bodegas de aviónica:

27: The first things to build are the walls that separate each compartment, and then you can detail the interior according to the pictures. I paint the electronic boxes separately and only glue them in place after painting.  Attaching them to plastic sticks makes painting easier. I like to glue as much wiring as possible before painting but there are some cables that must be attached after all the boxes are glued in place so there will be more wiring after the paintjob. Of course is essential to check that all the boxes fit in place before painting.
27: Lo primero es construir las paredes que separan cada compartimento, una vez hecho esto ya podemos detallar el interior de los compartimentos. Suelo pintar las cajas de aviónica aparte antes de pegarlas en su lugar así que las pego en unas varillas para poder manipularlas sin problemas durante la fase de pintura. Prefiero pegar todo el cableado posible antes de pintar, sin embargo siempre hay algunos cables que es mejor añadir después de pegar las cajas en su lugar así que todavía habrá que añadir algún cable después de la pintura. Por supuesto es esencial comprobar que todas las cajas encajan en su lugar antes de empezar a pintar.


28: The avionics bay doors have several identical locks so I decided to build only one lock and make a silicon mould. I then made the 12 locks I needed with two-part polyurethane resin.
28: Las puertas de los compartimentos de aviónica tienen varios cerrojos idénticos así que decidí construir solo uno y hacer un molde de silicona. Con resina de poliuretano bi-componente saqué las 12 copias que necesitaba.


29: Each door is made with two overlapping pieces of styrene sheet. The internal piece is made from 0.5mm sheet and the external piece from 0.1mm sheet. The external piece is a little bigger except in the upper side, which gives us an easy way to reproduce the border that mates to the fuselage. Next we can add the locks and the remaining details.
29: Cada compuerta está hecha con dos láminas de estireno superpuestas. La pieza interna está hecha con lámina de 0.5mm y la externa con lámina de 0.1mm. La pieza externa es un poco más grande excepto en el borde superior, de esta manera se reproduce fácilmente el fino margen que encaja en el fuselaje. A continuación se añaden los cerrojos y el resto de detalles.


30: The cannon/radar bay hatch is a very important element because as it has really attractive wiring. I used the kit part and refined the edges with files and sandpaper. Along with the multicolor stretched sprue used to make the cables I also used metallic wires with white insulation. These imitate the real thing perfectly. The big greenish square that represents the ammo drum quilting is made from epoxy putty and textured with a brush.
30: La compuerta de la bodega del cañón/radar es un elemento muy importante ya que tiene un cableado muy atractivo. Usé la pieza de la maqueta a la que afiné los bordes con limas y lijas. Aparte de los cables multicolores hechos con plástico estirado también utilicé unos cables eléctricos con funda plástica que imitan perfectamente los cables reales. El cuadrado verdoso es el acolchado del cañón y está hecho con masilla epoxi texturada con un pincel.


31-32: And here´s the result. Everything fits in place and looks good, so it´s time to celebrate with a cold beer...or two.
31-32: Este es el resultado. Todo encaja en su lugar y tiene buena pinta, así que es hora de celebrarlo con una cerveza fría...o dos.

  • Digg
  • Del.icio.us
  • StumbleUpon
  • Reddit
  • RSS